Oracle Application Server 10g R2 – Installation
Introduction
Oracle Application server 10g is a middle ware software by Oracle.
Purpose of Application server is to handle the business intelligent and
logic. Below is the difference between a two-tier architecture and
multi-tier architecture.

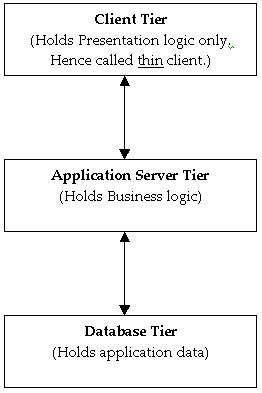
In case of a two-tier architecture we business logic and presentation
is both handled by client. Hence we call it thick client. Where as in
case of multi tier architecture we have only presentation layer in
client side and business logic is handled by Application server. Hence
such clients are called as think client. Below is the three tier
architecture show.
 Advantages of 3-tier architecure
1) In case of change in business logic the change needs to be done
only in Application server (mid tier) as its centralized. Where as in
case of two tier architecture ever client needs to be changed. So
management is easy.
2) It reduces the network traffic, because in case of 2 tier
architecture the protocol used is TCP/IP which is a stateful connection
(continuous). So even if data is been send or not connection will always
be there. This increases network traffic and reduces bandwidth. Where
as in 3 tier architecture we have TCP/IP connection only between mid
tier and database and is set when client request for some data. As soon
as data is provided the connection is closed. The connection between
client and mid tier is http which is a stateless connection.
3) Performance is another factor which make 3 tier architecture a
better solution over 2 tier architecture. Since all business logic gets
executed at client side, performance on client reduces. This is in
addition to database performance issue. In case of 3 tier architecture
performance is not an issue and is handled well in Application server.
Lets start with Application server 10g
Application Server 10g Components
Below is a very simple line sketch of application server 10g
component architecture. This shows what are the components that are
present in AS (Application Server) and why those are required.

All the above components shown above comes with AS 10g R2 installation. All these components are categorized as given below.
All the components shown in green color + OHS for mid tier (on left) + Web cache is installed as mid tier components. So
mid tier includes
- Web Cache
- OHS (Oracle HTTP Server)
- OC4J
- FORMS
- REPORTS
- DISCOVERER
- PORTAL
- WIRELESS
While installing this middle tier, the installation of these components are divided into 3 main components.
- J2EE and Web Cache (This will install Web Cache, OHS and OC4J)
- Portal and Wireless (This will install all components of J2EE and Web Cache + Portal and Wireless components)
- Business Intelligence and Forms (This will install all components)
If we are installing just option 1 (J2EE and Web Cache) then
infrastructure tier is not required. However we can still install
infrastructure tier but in this case it wont be used by these 3
components of mid tier.
If we are installing either option 2 or 3, we have to install
infrastructure tier before installing these mid tier components. This is
because these middle tier component such as portal and wireless will
create there own repository in infrastructure’s meta data repository. So
its important that we first install infrastructure tier before
installing mid tier, in case we want to go for option 2 or 3 for mid
tier.
The other components shown in blue + OHS on right side are installed as infrastructure tier. So
infrastructure tier includes following components
- OHS (Oracle HTTP Server)
- Meta Data Repository
- SSO (Single Sign on)
- OID (Oracle Internet Directory)
- DAS (Delegate Administrative Services)
- OCA (Oracle Certification Authority)
Out of the above components of infrastructure tier SSO, OID, DAS and OCA are together called as
IDM (Identity Management). So infrastructure tier contains mainly meta data repository and identity management.
Having this brief knowledge above AS 10g R2 components, lets start with installation.
Installing Oracle Application server 10g R2
Before starting the installation, we should complete the pre-installation checks. This includes following steps.
Pre-Installation Task
1) Check the required packages are installed in OS or not.
glibc-2.3.4-2.9
glibc-common-2.3.4-2.9
binutils-2.15.92.0.2-13
compat-libstdc++-296-2.96-132.7.2
gcc-3.4.3-22.1
gcc-c++-3.4.3-22.1
libstdc++-3.4.3-22.1
libstdc++-devel-3.4.3-22.1
openmotif21-2.1.30-11.RHEL4.4
pdksh-5.2.14-30
setarch-1.6-1
make-3.80-5
gnome-libs-1.4.1.2.90-44.1
sysstat-5.0.5-1
compat-db-4.1.25-9
control-center-2.8.0-12
xscreensaver-4.18-5.rhel4.2
you can check the status of package using
rpm -q command. as a root user.
2) Add following in
/etc/sysctl.conf
kernel.shmall = 2097152
kernel.shmmax = 2147483648
kernel.shmmni = 4096
# semaphores: semmsl, semmns, semopm, semmni
kernel.sem = 256 32000 100 142
fs.file-max = 131072
net.ipv4.ip_local_port_range = 10000 65000
kernel.msgmni = 2878
kernel.msgmax = 8192
kernel.msgmnb = 65535
3) Make entry of hostname and domain name in
/etc/sysctl.conf
kernel.hostname=advait
kernel.domainname=oracle.com
4) Make following changes in
/etc/security/limits.conf
* soft nproc 2047
* hard nproc 16384
* soft nofile 2048
* hard nofile 65536
5) Add the following line to the /etc/pam.d/login file
session required /lib/security/pam_limits.so
6) Make the following entry in /etc/profile
if [ $USER = "oracle" ]; then
if [ $SHELL = "/bin/ksh" ]; then
ulimit -p 16384
ulimit -n 65536
else
ulimit -u 16384 -n 65536
fi
fi
7) Create a group and user.
Primary Group – oinstall
/usr/sbin/groupadd oinstall
Secondary Group
/usr/sbin/groupadd dba
/usr/sbin/useradd -g oinstall -G dba -md /home/oracle oracle
Give the password
[root@dhcp-hydcampusp1-10-176-107-101 home]# passwd oracle
Changing password for user oracle.
New UNIX password:
BAD PASSWORD: it is based on a dictionary word
Retype new UNIX password:
passwd: all authentication tokens updated successfully.
8) Make changes in /etc/hosts as root user and make following entry.
(IP Address) (hostname.domain.name) (hostname)
Example
10.176.106.101 advait.oracle.com advait
Installing Infrastructure Tier
The installation of AS10g should be done in specific order only as
explained before. This is because of the dependencies between the
components. Here we are going to install Portal and Wireless option of
mid tier, this needs database repository for storing the information of
these components. So we will first install infrastructure tier and then
install Mid tier. Please follow the below screen shots.
run the runInstaller executable present in your Disk1 directory of software dump.
 Screen 1 : Welcome –
 This is the welcome screen. Click on Next.
 Screen 2: Specify Inventory location –
 In this case
you can take the default inventory location and then it will ask to run
orainstRoot.sh script as root user. Once you run this script as root
user on that host, click on continue.

Click on Next
 Screen 3: Specify File Locations –
 Specify the location of Oracle Home for Infra tier and click next.
 Screen 4: Select the product to Install –
 In this
case select “Oracle Infrastructure 10g”. If you choose “Oracle
Application Server 10g”, then it will install infra tier first and then
automatically start installing mid tier.
 Screen 5: Select Installation type –
 As I said
before infra tier consists of mainly IDM (Identity Management) and
metadata repository. IDM consists of OID, SSO, DAS and OCA. Meta data
repository is a 10g oracle database. We will choose both to install
here.
 Screen 6:
 runInstaller will perform the basic check
on operating system. If for any of the check it generates warning, you
can verify the same using the check box and then click on next.
 Screen 7: Pre-Installation Requirement –
 You should have root privileges as you need to run root.sh after installation. Select the checkbox and click on next.
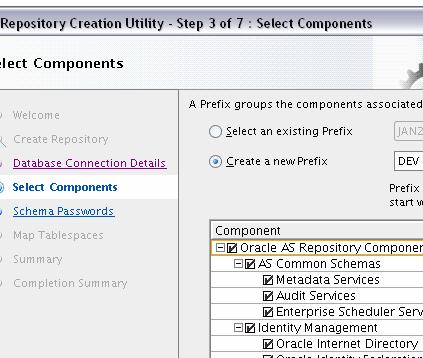
 Screen 8: Select Configuration Option –
 You can select individual components which we are going to install.
 Screen 9: Port Configuration Option
 – For Port
Configuration, select Automatic port selection to keep installation
simple. Else you can specify the ports in staticports.ini file and
upload the same.
 Screen 10: Namespace in Internet Directory
 - Select
the default name space only. If your /etc/hosts name file is correct
then the default port will be populated correctly. Else it may get
populated as localhosts also. In that case check the entry in
/etc/hosts.
 Screen 11: OCA Distinguish Name –
 You can specify only the mandatory fields. This is required for creating digital certificate for SSL configuration.
 Screen 12: OCA Key length
 - This is the key length to be used for encryption. You can select the default 2048 and click on next.
 Screen 13: OCA Administrator Password
 - This is the password for Oracle Certificate Authority admin. Select any password, confirm the same and click on next.
 Screen 14: Database Configuration Options
 – Here we provide the name of the database. You can accept the default orcl or give any new name.
 Screen 15: Database Schema Password
 - Select any password for database schema, confirm the same and click on next.
 Screen 16: Instance Name and ias_admin Password
 -
Here we are creating a new instance. Note that this is different then
database instance. So for infrastructure tier you can give any name
(example infra) and also password you want to use for enterprise
manager.
 Screen 17: Installation Summary
 - At the end it will show installation summary. Click on Install.

It will show the installation progress. Remember that it is just
copying the files and will do some setup. The actual component
configuration will come next.

Installer has now started with component configuration. It will configure each component one by one.

When it comes to Meta Data Repository, it will create a new database using DBCA.

At the end of installation it will show the URLs and ports. The above
URL is the URL for EM of Infra. Remember we will have 2 EM (Enterprise
Manager), one for infra and one for mid-tier.
With the completion of infra tier, we can now start with installation
of mid tier. But note that during installation of mid tier your
infrastructure tier should be up and running.
Installing Mid Tier components
run the same runInstaller executable present in your Disk1 directory
of software dump which you used during infra tier installation.
 Screen 1 : Welcome –
 This is the welcome screen. Click on Next.
 Screen 2: Specify File Locations –
 Specify the location of Oracle Home for mid tier and click next.
 Screen 3: Select Product to install
 - If you
remember for infra tier installation we selected second option, i.e.
“Oracle Application Server Infrastructure 10g”. Here we have to install
mid-tier, which will be present inside “Oracle Application Server 10g”
option. So select “Oracle Application Server 10g” option.
 Screen 4: Select Installation Type
 - Here you can
select the required installation type depending on the components you
want to install. For this installation we will go for
Portal and Wireless.
 Screen 5:
 runInstaller will perform the basic check
on operating system. If for any of the check it generates warning, you
can verify the same using the check box and then click on next.
 Screen 6: Pre-Installation Requirement –
 You should have root privileges as you need to run root.sh after installation. Select the checkbox and click on next.
 Screen 7: Select Configuration Option –
 You can select individual components which we are going to install.
 Screen 8: Port Configuration Option
 – For Port
Configuration, select Automatic port selection to keep installation
simple. Else you can specify the ports in staticports.ini file and
upload the same.
 Screen 9: Register with OID
 – Here you need to
provide the hostname and port number of OID which you have already
installed as a part of infra tier. By default the port number is 389.
You can also check the port numbers of infra tier by going to
ORACLE_HOME/install directory and checking file portlist.ini. Here
ORACLE_HOME refers to infra ORACLE_HOME.
 Screen 10: OID Login
 - Here OID superuser login
should be given. by default its always orcladmin. You have to give the
password for this user. This password will be set for orcladmin. You can
give any password.
 Screen 11: Select AS10g Meta Data Repository
 - This will show the name of database that we created as meta data repository as a part of infra installation.
 Screen 12: Specify Instance Name
 - Here you will
specify the name of the instance that needs to be created for mid tier
and also the admin password for logging into EM (Enterprise Manager).
 Screen 13: Summary
 - At the end it will show summary. Click on install.

You can see the progress of installation. After this initial copy and
setup, it will start configuring each components one by one as shown
below.

Progress of each component.

At the end it will give the URL for enterprise manager and port
details. You can access enterprise manager to manage Application server.
I don’t want to extend this post more now. This completes the installation. More details will be provided in next posts. Thanks.
Hope this helps !!
References:
Oracle Application Server 10g R2 Installation guide
http://avdeo.com/2008/04/15/oracle-application-server-10g-r2-installation/